Thursday, October 11, 2012

Crochet Satchel/Over the Shoulder Bag

So, i really wanted a over the shoulder bag that was big enough to hold my laptop. As it is if i am going to campus i either bring a purse or my backpack. The only problem is sometimes i don't want to bring all my school work up, but i want to bring my computer. I usually end up taking my backpack so i have something to hold my computer. I wanted a purse that would be big enough to to bring my computer to more casual things then school. I have been thinking about crocheting one for a while, and finally did. I was going to use a free pattern i got from Joann, with some alterations, but just ended up basing the panels on that pattern. It isn't on the Joann website, but is on the Bernat website here:

 http://www.bernat.com/pattern.php?PID=2234

Here are some pictures of the final product:


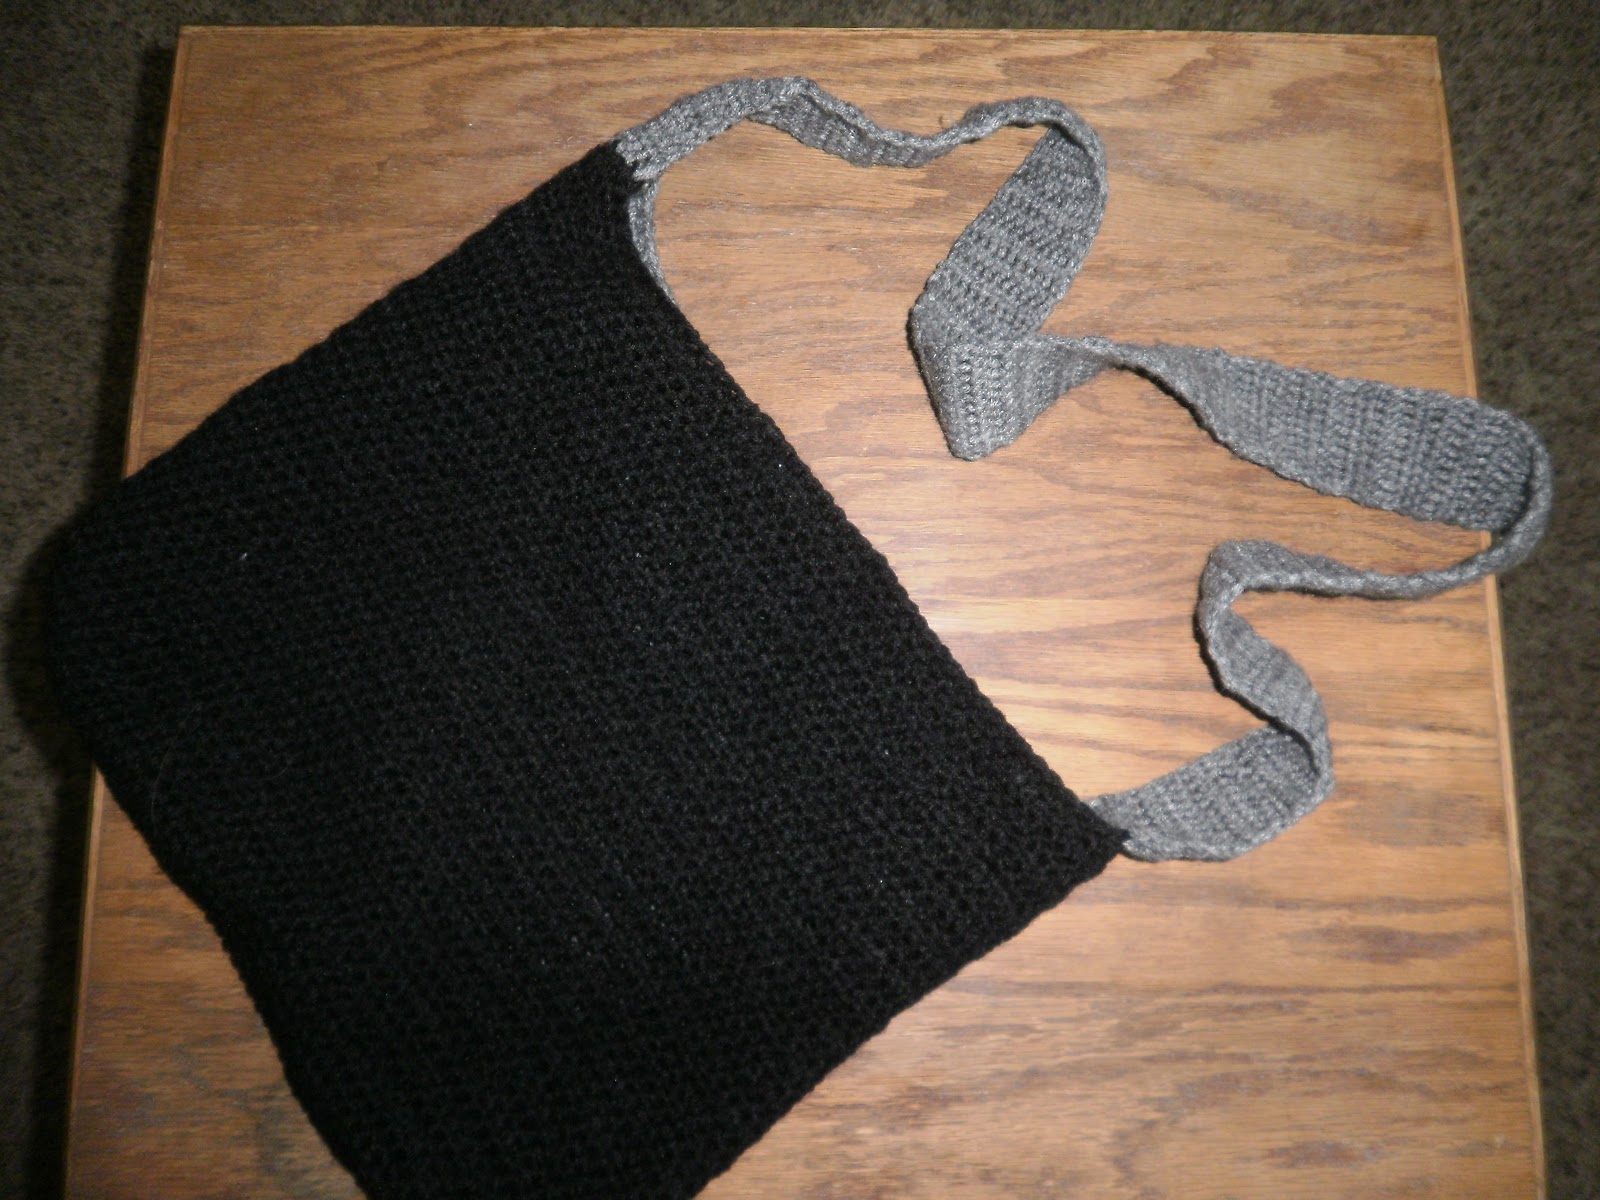
One panel is grey like the strap and the other is black as an accent color. I really like how it turned out. I thought about putting a flap that was also black that would attach to the black panel and rest over the grey panel, going about two thirds of the way down it. I decided not to, but think that it is a fine alteration, depending on what the bag is wanted for. You can also easily edit the height or width of the panels, as well as the strap length.

Hook size H or I,

Panel (make two):
1. Ch. 40. Turn.
2. hdc twice in second ch from hook, continue to hdc once in each ch until you reach the last ch in the row. hdc twice in the last ch in the row. Ch 2. Turn.
3. Repeat expansion rows like step 2 for 5 more rows, or until have soft corner for the size of bag you are making
4. Continue in hdc (no expansion) until you reach 12 in, or the desired height. Tie off.

Connect panels:
Slip stitch panels together. Start with right sides together, working from the top of one side, and continuing down and around until you reach the top of the other side. Tie off.
*On the bottom slip stitch bottom st together. On the sides, do one slip stitch per row.

Strap:
Tie yarn to spot 6 st. away from the edge of the panel, including the st. used in slip st. sc in 5 st until seam, and 5 st after seam, making the strap 10 st. wide. ch. 2. Turn
hdc across the 10 st, ch 2, turn.
repeat until strap is desired length*- around  105 hdc rows.
*strap will stretch making it longer and skinnier. Make sure you take this into account when deciding a length.
Slip stitch end of strap to the 10 stitches centered on the other seam.


Crochet Dishcloth/Hotpad

I wanted to crochet some hot pads and maybe dishcloths, and i found this  pattern i had picked up at joanns. It looked like it would be good for the dishcloths. I used it and it came out bigger then anticipated, so i might scale it down a little. More specifically the width was to wide. I would use less stitches across. Anyways, here is the pattern:

http://www.joann.com/static/project/0706/P148439.pdf

So onto the hotpad. I am using a size G (4.25mm) hook. i want it to be pretty tightly woven, because i've had crocheted hotpads where the stitching slipped and my finger ended up getting burnt. I also wanted the hotpad to be thick enough that it could adequatly insulate my hand. I have used other hot pads that were fine until thirty seconds after i picked up the hot item, and then all of the heat passed straight through them. So in summary This is a dense, thick hotpad.

1. ch. st to desired width of hot pad. (I used 30, some people like their hot pads to be bigger).
2. sc. in second ch. from hook. continue to sc across rest of row.
3. Ch 1 and turn. sc across row, being careful to only pick up the front portion of the loop. Once you reach end of row, turn and continue to sc on the same row, picking up the back, unused portion of each loop (now in front). Continue to end of row.


4. ch 1, and sc picking up the middle portions of the loops (back portion of the front loop and front portion of the back loop). cont. til end of row.


5. Repeat steps 3 and 4, until you reach the desired height for hot pad. end on a odd row (like step four). 
 

Wednesday, October 10, 2012

Breakfast Trifle with Grits Base

A few years back i was watching Food Network with my dad. He is from South Carolina. The show Down Home with the Neelys came on. They were making a Sunday breakfast. It looked soooo good. The main dish was a breakfast trifle with grits as the base. I don't know if you have ever tried grits, most people not from the south haven't, but they are delicious. Grits are made from coarsely ground corn. Grits come in two varieties, white and yellow. We usually use white grits for breakfast. I have some friends that assumed grits should be sweetened when eaten for breakfast like oatmeal or cream of wheat, which isn't accurate. Grits are usually eaten salty. A well loved breakfast at my house is eggs, bacon, sausage, and grits. We even cook the eggs in the bacon fat. It is super delicious, but fattening (all the bacon fat), so we don't make it very often.
The recipe for breakfast trifle the Neely's used can be found here:

http://www.foodnetwork.com/recipes/neelys/breakfast-trifle-grits-recipe/index.html

After watching the show i decided to make breakfast trifle too. I loosely based it on their recipe. Some variations i made were to use scrambled eggs (i was cooking for a lot more people then two), add bacon and sausage, and no tomato. I think we used other vegetables like bell peppers. It was really delicious. Obviously this recipe has a lot of room for personal taste. It makes a filling breakfast that includes protein, dairy, vegetables, and grains. I am getting really hungry just thinking about the trifle. I think i will make some.